The iconic Mont Saint-Michel is one of the most special and most beautiful places on earth… it’s not only a dream travel destination – it’s also every photographer’s dream! If you have decided to make a trip there, I’m sure you’ll have an amazing time there as I did! Whether you’re traveling from far away like I did (from San Francisco), or from somewhere closer, you’ll want to make sure to plan ahead to be able to capture some memorable and unique photos for your once-in-a-lifetime trip. In this post, I’ll share with you the best photography tips for Mont Saint-Michel, including the best photo spots!
This post covers photography tips for the outside of Mont Saint-Michel while my Mont Saint-Michel trip post has more photos and details about visiting the abbey and island.
All photos were taken by me and my husband Ken. I currently use a Sony a6700 camera which I love!
* This blog post may include affiliate links. Learn more about my affiliate & cookies policy here. Thank you for supporting this flowery blog! 💛🌸🌿
Planning Your Trip to Mont Saint-Michel
Mont Saint-Michel is an absolutely magical place, a medieval island and abbey resembling a faraway mysterious castle on a tiny island. It’s especially magical if you visit at the right time. Ideally, you’re reading this post before setting your travel dates, but I’ll share some photo tips that should be useful regardless of when you visit.
Some things to consider when planning your trip are the time of year and the tidal calendar. One of the most distinctive and unique images of Mont Saint-Michel is undoubtedly of the abbey being surrounded by water. This, in fact, only happens during high tide days, which revolve around the moon phases. So if this type of picture is important to you, you’ll want to consult tide tables to increase the odds of being able to experience this while you’re there (more below). Otherwise, don’t be surprised to find the abbey surrounded by mud instead!
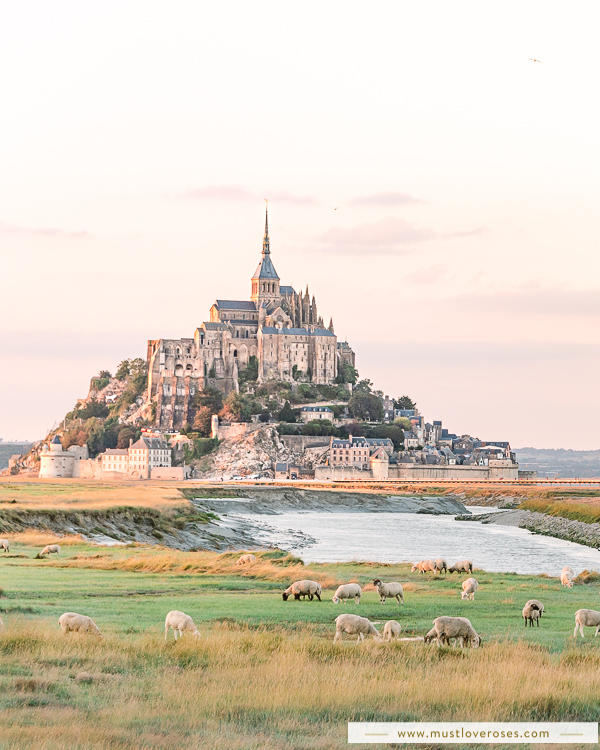
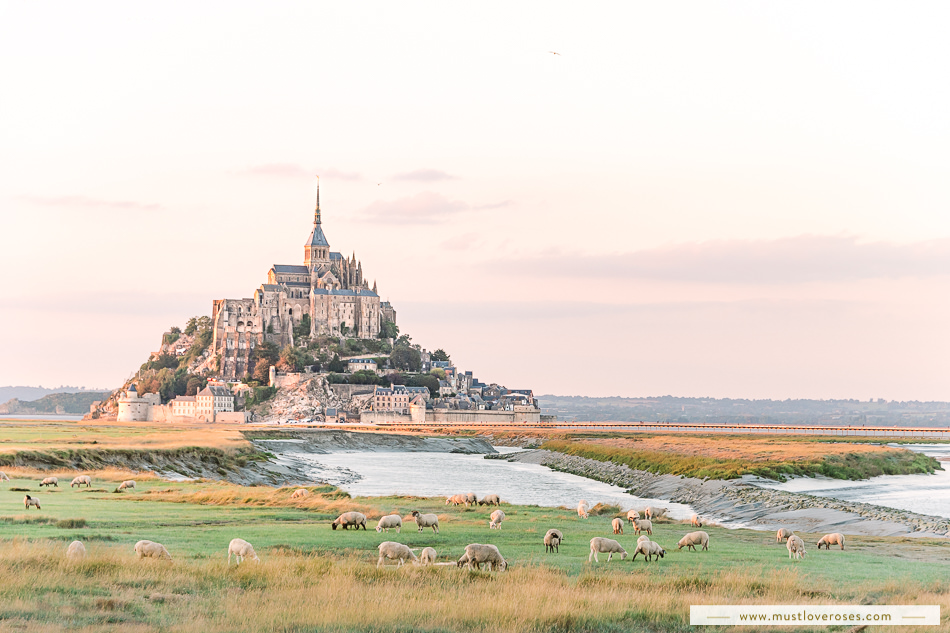
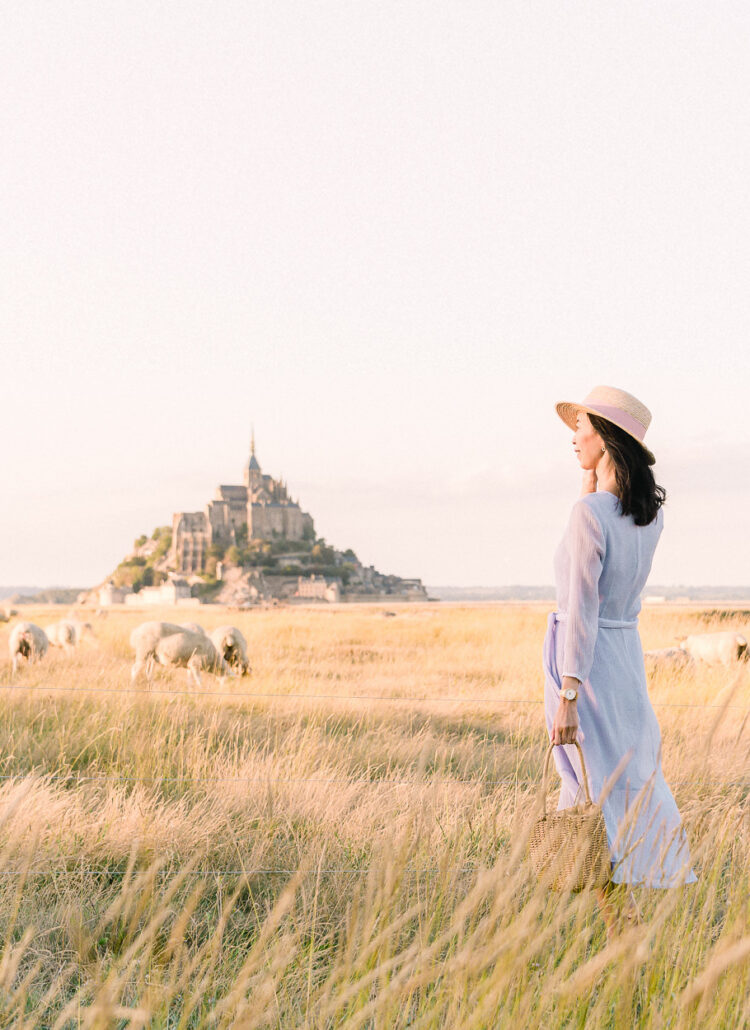
Another distinctive image is of the abbey and island in the distance with sheep grazing in the foreground. In order to take this type of picture, it’s important to know where to look for them.
You should plan to spend a good amount of time away from the island to be able to take these types of pictures. We spent two nights there in order to visit both the island and abbey and to take a variety of pictures from a distance and were happy that we did.
🌸 My Photo Gear Essentials 🌸
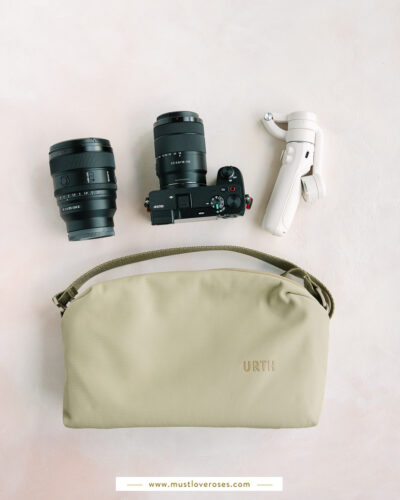
Sony a6700 camera – great for photos & 4k videos!
Sony 18-135mm APS-C Zoom Lens – this small & light lens is so sharp & versatile!
Sony FE 85mm f/1.4 GM II Lens – a very special lens for flower close-ups and portraits
DJI Osmo Gimbal Stabilizer for iPhone (newer model) – a gamechanger for smooth iPhone videos
Urth Crossbody Camera Bag – the best camera bag – so sleek and well made!
#AmazonAffiliate
Photography Tips for Mont Saint-Michel
1. Plan to Visit During High Tide
Mont Saint-Michel looks the most dramatic during high tide days when the abbey appears to be perched on a small island surrounded by water. The tides are governed by the interactions between the sun, moon and earth and high tides occur when the three are in line with each other. The highest tides take place 36 to 48 hours after the full and new moons. High tide days are easy to find at the following two websites with tide tables:
The Mont Saint-Michel Tourism Website – There is a downloadable tide table from this website. High tides are highlighted in yellow and the days in red are the big flood days when the tides are so high that Mont Saint Michel may become a true island, being surrounded by water, with the causeway possibly submerged also. The table is in French.
The Meteo Consult website – This website is in English and has a simplified table showing when the high and low tide times are.
If you want to see the high tide, look for the days with a tidal coefficient over 90. On the days that we were there, the coefficient ranged from 85 to 104.
IMPORTANT – Please note that it’s very dangerous to walk around the island during high tide times!
2. Try to Visit in the Spring or Fall
Mont Saint-Michel is an amazing place to visit, but it can also be crowded, rainy and cold. We have friends who visited when it was storming the entire time and didn’t get any decent pictures! For the best weather and the least crowds, try to visit in the early Fall or Spring.
According to the Normandy Tourism Office, the least rainy months are June, July, August, and September. The coldest months are December, January, and February. The Summer months of June, July and August have nice weather, but also large crowds.
When we visited in mid-September, the weather was very nice, if a bit windy at times. There was some light rain, but for the most part, it was quite pleasant (warm enough for a short sleeve shirt or dress in the afternoons). It does get cold in the evenings and early mornings though, so being prepared is important!
3. Research and Plan Your Photography Locations Ahead of Time
Planning your photography locations is important to not only save time, but also to make sure you get the types of photos you want. I’ll share my picks for the best photo locations and times below. As I mentioned above, make sure to plan enough time to spend away from the island and abbey in order to take pictures of the them from a distance.
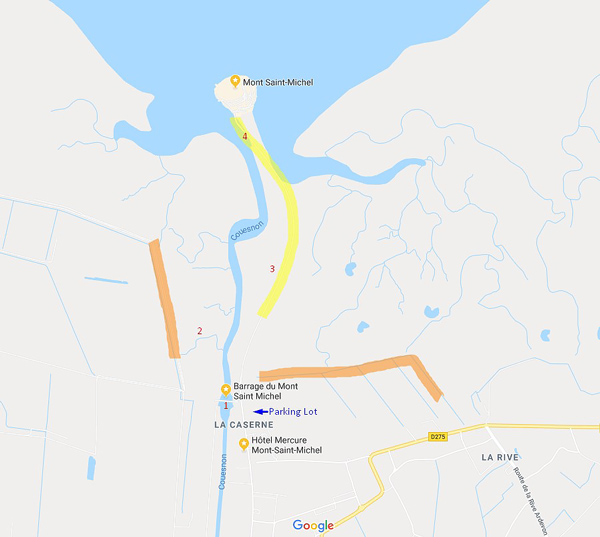
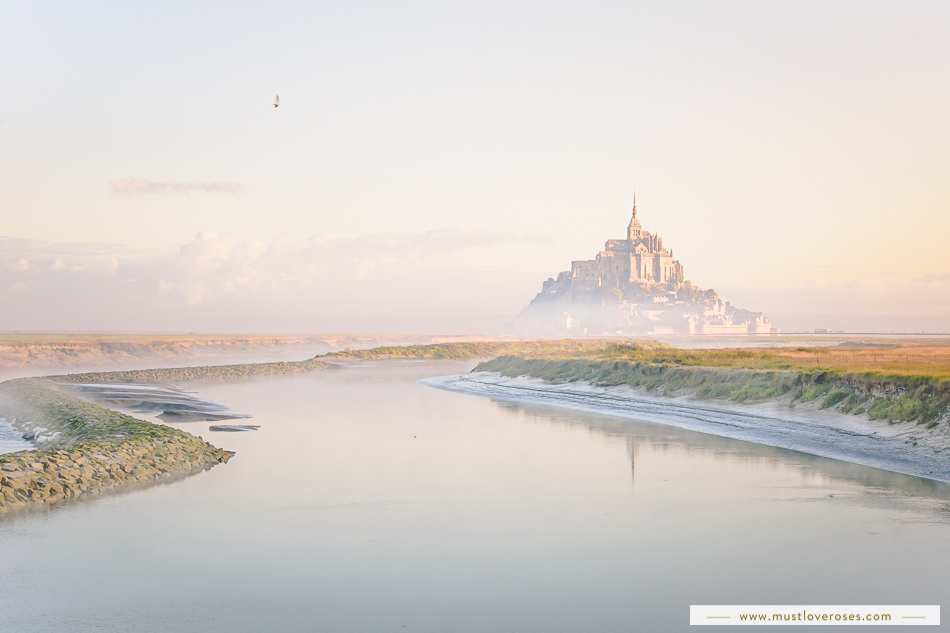
4. Shoot From The Dam
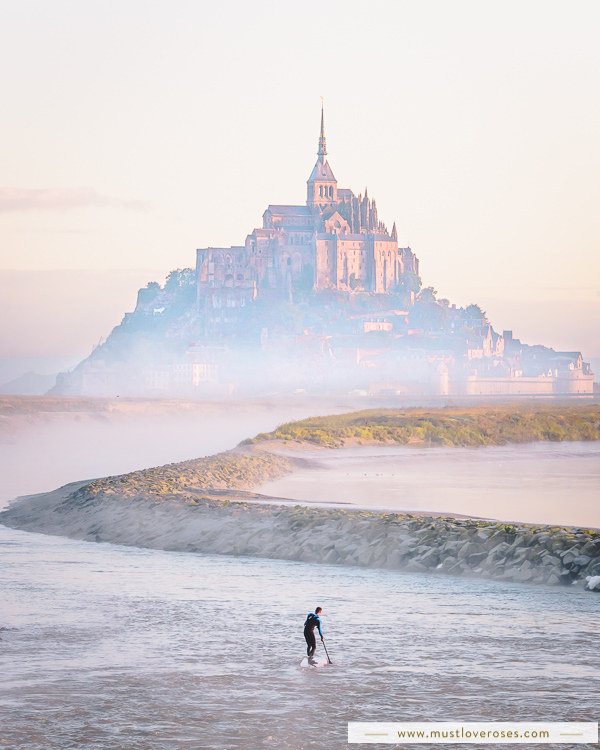
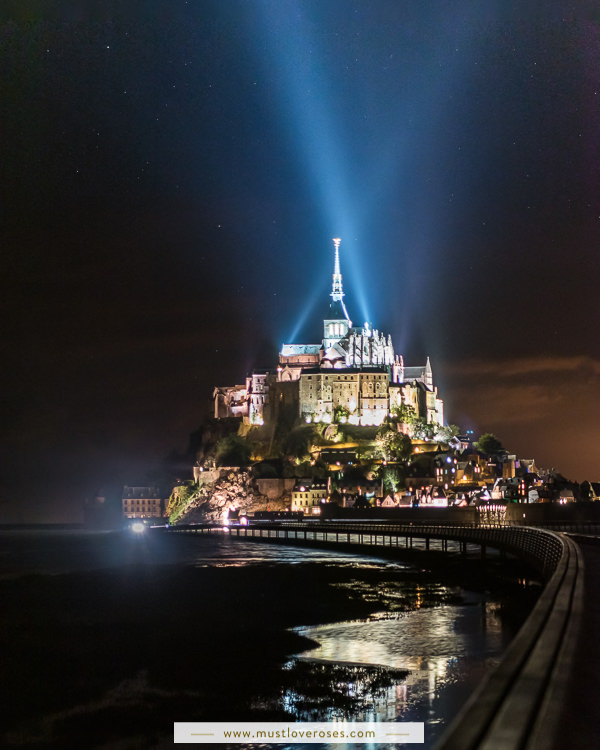
Since the abbey is so big, you’ll need to photograph it from a distance to capture the entire abbey along with some foreground and some sky. Fortunately, you don’t have to go far for a great view of the abbey and island since the dam overlooking the Couesnon river provides a fantastic viewpoint. It was from this location (point #1 on the map) that we captured the evening photo with the spotlight from the abbey and the photo with the surfer paddling towards the island in the morning. From this location, it’s best to have a telephoto lens since the abbey is a distance away.
To get to the dam, you can get off at the shuttle stop just before the causeway gate, or park your car in the parking lot next to it. Walk across the street to the dam, which is labeled “Barrage du Mont Saint Michel” on Google Maps.
5. Shoot From The Causeway
To take closer-up photos of the abbey, there are many opportunities along the 1.5-mile causeway leading to the island and abbey from the parking lot. Some of the photos on this page were taken from approximately points #3 and #4. The abbey will be quite large from this closer distance, but you can capture some details here that you can’t from further away.
The causeway can be walked at all times of the day, but cars are not allowed on the causeway and the island is only accessible via the free shuttle, walking or via a horse-drawn carriage. If there is some water surrounding the island, it may be possible to get photos with a reflection of the abbey in the water.
Learn More About Mont Saint-Michel!

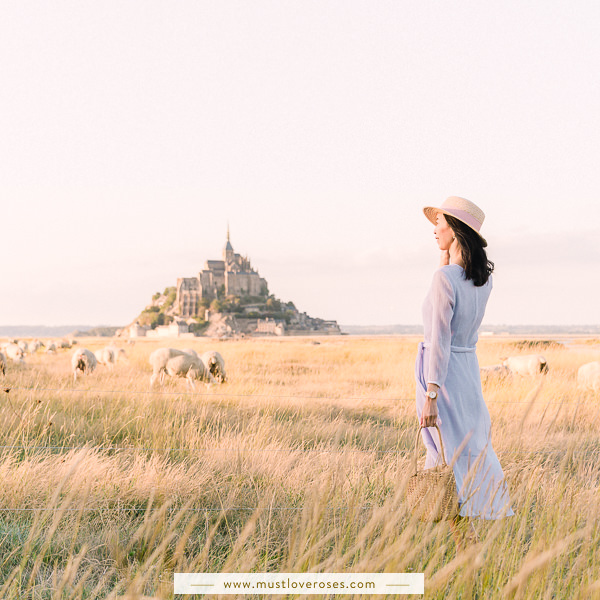
6. Shoot From The Meadows For Sheep in The Foreground
One thing that I really wanted to capture were photos with sheep or hay bales in the foreground with the abbey in the background. Based on pictures that I had seen online, I knew that the places to look for grazing sheep and hay bales would be somewhat close to the island but not on the island itself.
People have reported seeing sheep close to the paths highlighted in orange. Based on my observations, the best way to get to these areas is to simply walk from the dam to the meadows west of the river, or from the parking lot (or the causeway) to the meadows to the east. From these areas, it should be possible to spot whether there are any sheep out grazing that day. We didn’t see any on our first day, but we saw a lot of them at the meadows west of the river on the second day.
Please note that there is a barbed-wire fence surrounding the sheep in the meadow area west of the river. We chose to take our photos without crossing the fence, but while we were there, at least two other small groups of people did jump over the low fence for photos. Others have reported being able to walk further down that field or the path highlighted in orange for closer up photos with the grazing sheep; however, we didn’t go that far down and can’t confirm.
7. Shoot at Les Méandres (The Meandering Lake)
Another iconic photo of Mont Saint-Michel is with the meandering lake in the foreground. (See an example on the Mont Saint-Michel Tourism Website.) This lake is located in the meadows east of the river and is more likely to be filled with water in the Spring during high tide. In other seasons, you may find sheep or hay bales in the area. We didn’t venture that far into this area during our trip since we didn’t see any sheep there and we spent most of our time at the photo locations. This area would be also be a good spot for sunset pictures since the abbey would be to the west.
8. Shoot at Golden Hour
Golden Hour (the hour before sunset) is a great time for taking photos in general and with Mont Saint-Michel in the background, it’s absolutely amazing! If you’re lucky, you’ll have some beautiful sky colors in addition to the golden light with the iconic abbey in the background. My feature photo was captured during golden hour with the sheep in the foreground and is one of my favorites!
We often use weather and photography apps such as Sun Surveyor to check sunset and golden hour times and also for sun and moon positions.
9. Shoot at Night for Dramatic Lights
In the evenings, from sundown to midnight, the abbey is lit up and it’s a spectacular sight on a clear night! You’ve traveled this far, why not stay out a bit later to be able to capture this unique sight? The viewpoints from the dam and from the causeway are perfect for these photos.
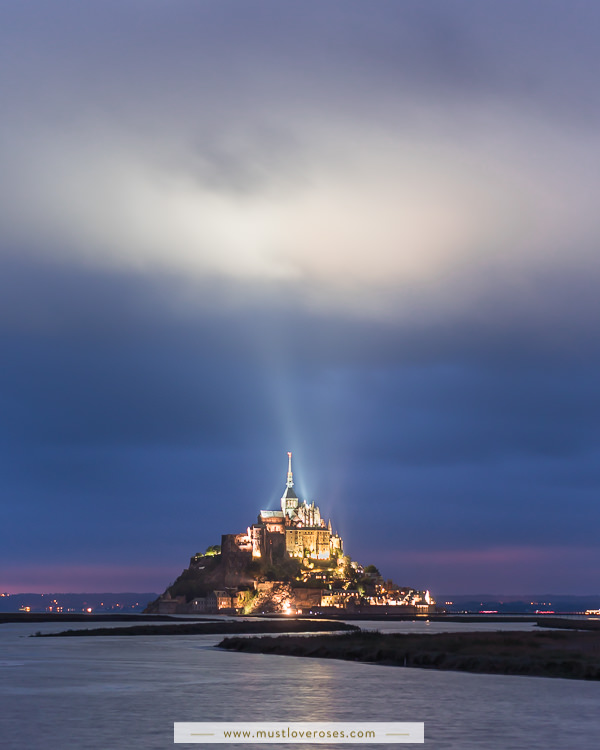
On our first evening there, we were taking pictures of the abbey with the lights from the dam (photo point #1) at around 9 pm when a bright cloud suddenly appeared over the lit-up abbey. It created such an amazing cinematic effect that we snapped away continuously until the cloud dispersed, so happy that we were able to capture such a magical sight!
In order to take sharp evening pictures, a tripod and a longer exposure time are essential!
10. Bring a Tripod
I definitely recommend bringing a sturdy tripod if you plan to take pictures during the golden hour and beyond (and you definitely should!), because evening pictures are always better and more stable with a tripod, especially for longer exposures.
We were happy to have a sturdy travel tripod for our evening photo sessions not only because it’s needed for long exposures, but also because was so windy in the evenings. We actually had to weigh the tripod down with our camera backpack because there was a fair amount of shakes from pedestrians on the dam walkway. (tip – stand further back on the walkway for more stability)
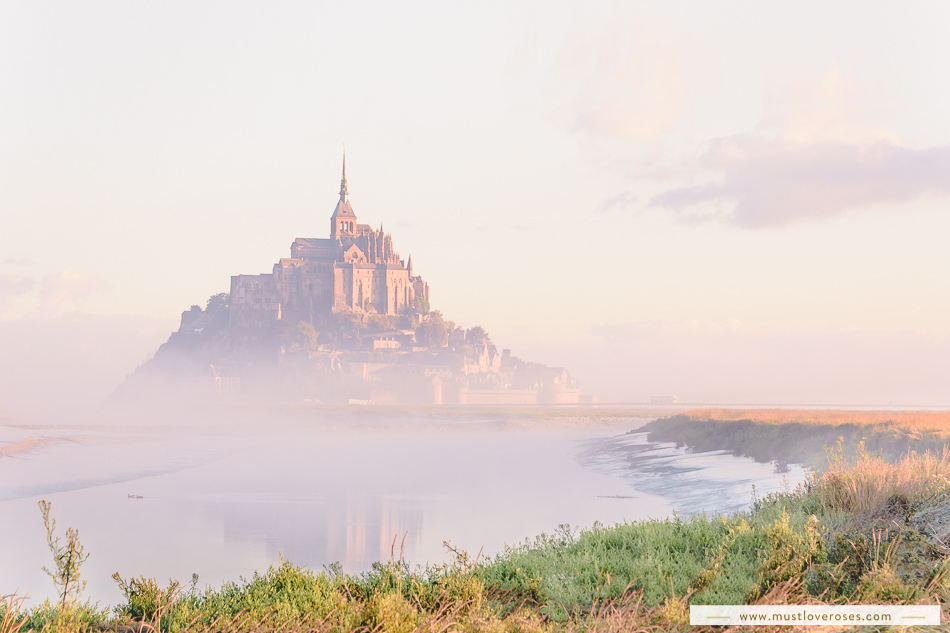
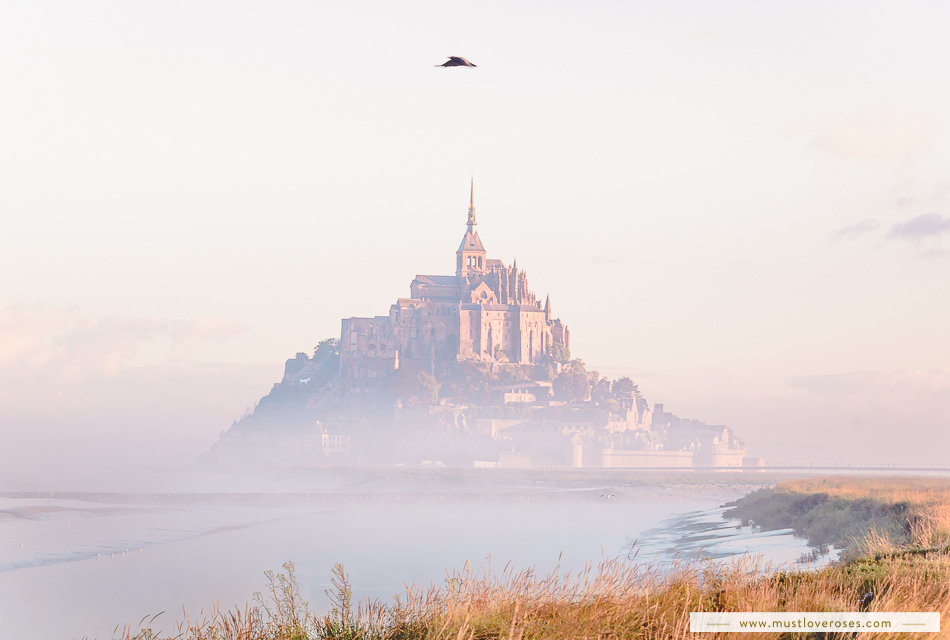
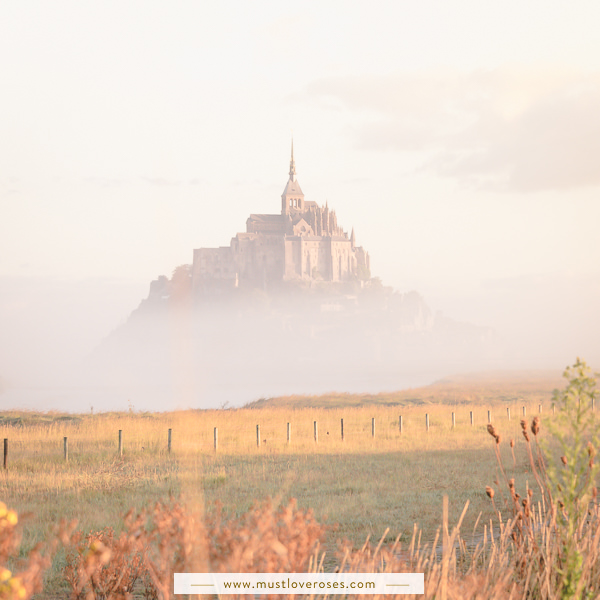
11. Shoot in the Morning for Moody Misty Photos
Mornings are a great time to take photos with the island and abbey often partially covered in fog. The mist creates an almost mystical effect that adds to the beauty and drama. We absolutely love the morning photos we captured there! We were surprised to see a few surfers there in the morning, so this is another sight only possible during high tide! What an amazing experience it must be for the surfers as well!

For the morning picture with the paddling surfer above, we used a 135 mm focal length. This picture was taken at around 8:30 am after we spotted some people walking past our hotel window with surfboards and decided to follow them!
12. Bring Wide-Angle and Telephoto Lenses
To make the most of your photo shoot during your once-in-a-lifetime trip to this amazing place, I recommend that you bring both wide angle and telephoto lenses with you. For photos from the dam and from the meadows, you’ll want to have a telephoto lens – otherwise, the abbey will look quite small. For photos from the causeway, you’ll want a wide-angle lens since you’ll be much closer to the abbey.
I’ve included the lens and focal length used for many of the photos in this post. I hope you find this information useful! Also note that some of these photos may have been cropped slightly.
13. Prepare for Wet Weather
If you visit in the Spring, Fall or Winter, you’ll need to be prepared for some wet weather, not only for yourself, but for your camera equipment.
For example, a camera rain cover is inexpensive and lightweight, but will protect your camera in case of rain, so I definitely recommend bringing one unless your camera is fully weatherproof.
If you plan to walk in the meadows, especially if there’s some dampness, you’ll want to bring your waterproof shoes.
I also recommend bringing a small towel or some paper towels to wipe off your wet and/or dirty tripod before packing it away.
14. Plan Your Meals
One thing that we wish we knew in advance is that all restaurants in the area open around 6 pm and close at 9 pm. So if you plan to take photos during those times, be sure to pack food from a cafe or market ahead of time!
On our first evening there, we were so caught up taking pictures that all the restaurants were closed by the time we finished! It was around 9:30 pm and we didn’t realize that there would be absolutely no dining options available at that time and that no markets would be open either. The helpful front desk staff at our hotel told us that we could drive to the next town about 15 minutes away for some restaurants and small markets that close later. We ended up buying some items at a small market there for our dinner.
During our trip, we also grabbed sandwiches and other food from the Brioche Dorée bakery/cafe several times for a quick lunch or for a light dinner. It’s conveniently located next to a shuttle stop and a gift shop and is across the street from our hotel, the Hôtel Mercure Mont-Saint-Michel.
14. Stay Two Nights
In order to capture both daytime and evening pictures and also have time to visit the island and abbey, I highly recommend at least an overnight stay. We stayed for two nights and were happy that we did.
Also consider staying in one of the hotels on the mainland close to the dam and parking lot if you plan to take both morning and evening photos and from different locations. This makes it convenient to go back and forth between the different locations and your hotel. We stayed at the Hôtel Mercure Mont-Saint-Michel. and were very satisfied with the location, rooms and service.
Camera Gear You Should Bring to Mont Saint-Michel
- A high-resolution camera so that you can capture RAW images, important especially for evening photos!
For this trip, we used our full frame Nikon D750 (newer model Nikon D780). We have since started using a mirrorless Sony a6700 and a full frame mirrorless Sony a74, both of which also take amazing photos!
A telephoto lens for the pictures with the island and Abbey in the background.
A wide-angle lens for pictures closer to the Abbey. A phone camera may work for daytime pictures, but a DSLR camera is much better for evening pictures!
- A portable battery charger for your phone if you plan to take lots of pictures or videos with your phone like I did!
Multiple camera batteries (we brought all 5 of ours).
A camera rain cover in case of rain, which is common there! It’s an inexpensive and lightweight thing to carry around.
Explore More of France!


Thank You!
Thank you for stopping by my blog! I hope you found this post useful, and I hope you have a wonderful day!
Pansy ❤️

Hi, I’m Pansy!
Hello, thanks for stopping by! I’m Pansy, a California-based photographer, flower & nature lover, and travel blogger. 🌸🌼🌿
I also have a YouTube channel where I feature beautiful gardens, parks & flower fields. Make sure to follow me there if you love flowers & gardens! 😊
If you’d like to contact me, please send me an email or DM me on Instagram!
Pansy ❤️

Wow! The photos are stunning! Especially the ones shrouded in fog, it looks like something from a fairy tale!
Thank you so much Holly! I felt like I was in a fairy tale there!! 🙂
Omg all your photos are truly beautiful! I love them 😍
aww Lina thank you SO MUCH!! I’m so happy to hear that and I really appreciate it!! 😊
Absolutely unbelievable and out of a fairy tale! Bookmarking this for my future trip!!
Thank you so much for your kind words!! I hope you have a wonderful time there when you go! 😊
Omg I love learning about photography tips for specific places! It really helps get incredible photos! Your photos are stunning! Loving the magical look they all have to them!
Thank you so much Taylor!! 😊
Wow wow wow! These photos are stuuunning! Like a fairy tale. Beautiful shots.
omg thank you sooo much Maheen!! I really appreciate it!!
I love your pictures! So dreamy, especially the first one! Thanks for sharing 🙂
Thank you so much Daria! I really appreciate it!!
These photos are so beautiful! I have always wanted to visit Mont St. Michel.
WOW WOW WOW! I have seen pictures of Mont St. Michel on Instagram and it looks soo grand and fantastic. I bet it’s even beautiful in person. I love the way you write photo-taking settings, soo useful!!
Great photography tips! Thanks for sharing.